Wednesday, December 2, 2015

Natural Skin!

Do you love to contour but don't love that harsh Kim K. look? I've got a solution for you that will be perfect for the new year! 

Get ready to switch up your look and try something a bit more natural.

First thing first, put on your foundation and concealer. Just do your normal foundation rutine. You can use a tinted moisturize, a BB cream, or a powder foundation. All will work. You want to look like this is your skin. Depending on how much makeup you usually wear, choose a foundation that is right for you.
Once you've put on your foundation it's time for some sneaky contouring. I added just a little bit of powder contour on my temples, the base of my cheek bone and right under my jaw line. Just place the product at this point.                                                                                                     You can use any type of contour product for this. Cream, powder, foundation, or concealer will all work for this. The important part is that the product is a shade or two darker then your natural skin tone.

Blush is more important then contour and highlighting combined. If you wear foundation you probably need blush.


When you've got your product placed simply blend out. You want to use a clean brush for the blending and blend in the direction the contour should lay. For example I'll blend the contour on my cheek toward the center of my face along the bottom of the cheek bone.


After applying the contour just add blush and highlight if you want. They just finish up your normal makeup routine and appreciate how effortless your skin looks today!

Keep smiling
-Riki-


Tuesday, November 17, 2015

Contourting 101

 How do I Contour?

Hey Ladies! So today was super rainy and sad in Indiana so I decided to do a bit of contouring to cheer myself up. I know that some people don't understand or know how to contour but it's super easy once you get the hang of it.

First off I'll be using Anastasia Beverly Hills Contour Kit in Light to Medium. I just got this pallet and I AM IN LOVE! Its super bendable and very easy to work with. The only drawback is that it only comes in two shade: Light to Medium and Medium to Tan.

Any way! On to the main event. Make sure to contour after concealer and foundation but before you do blush and highlighting. So to get your contour in the right places for your face may take some tweaking but I have a fairly round face and this is my routine.

First you want to thin your face! 

To do this simply place your contour around the outer edges of your face. Think about how shadows would naturally fall. these are the places your want to add the contour. It will make the shadow more apparent and give the illusion that your face is a different shape.
The next step is to add contour under your cheekbones. You want to try to hallow out the area between your cheekbones and your jaw line. 

Think Sleeping Beauty not Maleficent.

If you go to harsh with the contour than you'll end up looking ill or way to tan.....
The last step is to add contour lines to your noes. I have a VERY large nose so I keep these lines as straight as possible. This helps make my nose look smaller but BE CAREFUL, if you contour your nose wrong you'll look like Pinocchio. 

After this step just blend away. I used the Real Techniques Limited Addition Metallic Contour Brush but most types of blending will do. Make sure to blend away form where the light would hit ie: into the hairline, into the jaw line, away from the nose, ect.
With a little practice you'll get the hang of it! Once it's all blended just finish everything else up and you'll look beautiful....but that's probably just because you're all already beautiful! 

Keep smiling! 
XO Riki


Tuesday, November 10, 2015

How to Use Color Correcting Concealer

Hey Ladies!!

So today I want to explain how to use color correcting concealers. I have reviewed a few of these type of products including NYX and Wet N' Wild Versions! Check those reviews out here!

I have heard a lot of people ask how I use these products and how to know what colors to put were. I have went ahead and numbered the colors in the pallet I was using (NYX Color Correcting Concealer).

WHAT TO USE?!


1) Yellow shades will combat darkness under the eyes. Use this if your darkness is purple based.
2) Green helps take out redness! I use this all of my chin and around my nose.
3) Purple is brightening and will help mask any yellow or brown areas on your skin. I sometimes use this under my eyes if I don't have dark circles.
4) Light Pinks will also help combat darkness. this shade should be used if your dark spots are green or blue based.
5) This is a natural colored concealer for light skin tones. It could be used as a highlight on darker skin tones in a pinch but if your fair this is the color you would use as typical concealer
6) This is a darker shade of concealer. If your medium toned this could be used as your typical concealer but I use it as a contour shade because I am VERY pale.

***this pallet comes in two shades this one and one that is a bit more natural and darker. I would recommend this version for almost all skin tones. You can mix the shades together to get a better match.


Now how to apply this!

Make sure to apply this before you apply foundation or any other face products!


Simply prime your face and then apply like you would regular concealer, Your going to think you look crazy but trust me.

Try to match the color you use to the blemish color opposite of it on the color wheel. That helps neutralize the unwanted color.


Blend out the edges, then apply your natural color concealer over the top of your color correcting concealer.

Once done finish applying your make up like you normally would! When your finished your skin should look flawless.


Tuesday, November 3, 2015

McDonalds All Day Breakfast LIES!


There is nothing that I love more than a bacon egg and cheese biscuit. So, when I heard that McDonalds was going to have all day breakfast I was super pumped…..

Sadly my dreams were dashed on Oct. 6th when I went it at noon excited to finally get my breakfast desires and THERE WAS NO BACON EGG CHEESE BISCUTS AVIABLE!
Come to find out only part of the menu is available and it depends on your state whether you can get the “Bacon Biscuit” menu or the “McMuffin- Sausage” Menu. Unacceptable.


I go in and there are very few options. I understand that there is only so much equipment to make food with so you can’t have all the options but I expected to be able to get both a McMuffin and a Biscuit. On top of this Biscuits and Gravy are available so all they really need is bacon!

I live in southern Indiana….all we eat is bacon. I feel lied to. This was not in the commercials…I expected a full breakfast menu. Sadly it was for naught.

Though in retrospect, McDonalds really only did this to help their stock prices and bottom line. And all day breakfast did do that. Since Oct 1st of this year their stock has raised 16.63 points and seems to be continuing an upward trend.


I’m still annoyed, and will continue to boycott McDonalds unless it is before 10:30AM but I suppose they have achieved their goals. 

Wednesday, October 28, 2015

Halloween Look- Drugstore


Since Halloween is coming, I decided to do a little Halloween inspired eye using the NYX Sex Bomb Shadow Pallet. This pallet comes with a matte red, shimmery nude and black, and nude, brown and black matte colors. I was actually quite impressed by the red. A lot of matte reds turn pink but this one did pretty well and I thought it was perfect for Halloween.

I also used: 

Sonia Kashuk Hidden Agenda Concealer Palette in light
Pixi by Petra Endless Brow Gel Pen in Medium
Elf Liquid Eyeliner in Black
Black Magic Mascara Drama and Curl

                                               
I began by covering my lid in the lightest shade of concealer to allow the red color to be more vibrant.  If you have a white eye primer or creame eye shadow that would work even better. I've already filled in my brows also.


 I then packed on the matte red shade over two thirds of my lid. This doesn't have to be perfect. You will blend it out later and it won't matter.I noticed that there was A LOT of fall out with this pallet but it was manageable


These eyes with some super red or black lipstick are sure to make a statement for Halloween!

.
 Next, use the matte black color to create a smoky look on the outher third and in your crease. Since it is Halloween go ahead and use WAY TOO MUCH! Black is cool and creepy.

Also, While your at it add just a hint of red on your lower lid under your lash line and tight line your whole eye using a flat brush and the black eye shadow. The best way to get a good inner black line is to carefully pat the shadow right on the inner edge of your lower and upper lashes, if the black color gets in your eyes your probably doing it right. This can be very painful and hard for some people if you don't like it you can always skip this step.

Once lash glue has dried put on about 5 COATS OF MASCARA and call it a day.


Finally, add a set of fake lashes on your upper lash line and half a set on your lower lash line at the outer edges. This is the hardest part but just let your lash glue get tacky first and set it as close to your lash line as possible. Put them right above your lashes so your real lashes help to support and keep the fake ones in place. Once lash glue has dried put on about 5 COATS OF MASCARA and call it a day. These eyes with some super red or black lipstick are sure to make a statement for Halloween!


Tuesday, October 13, 2015

What’s in my Birchbox? October


Brand: Amika
Product: Perk Up Dry Shampoo
Shade: N/A
Price: $21 (full size)
I have heard a lot about this product. I keep writing it off because momma ain’t about to spend $21 on dry shampoo. I must say the bottle is the cutest thing in the world…and since it came free in my Birchbox I’ll give it a good shot. I’m scared I’m gonna get addicted to this expensive product. As to the product itself, it smells ok, not amazing but I could get use to it. It doesn’t have any white residue but I have never felt a dry shampoo with this type of consistency. I feel the jury is still out on how I feel about this.

Brand: Skyn Iceland
Product: Hydro Cool Firming Eye Gels
Shade: N/A
Price: $30 (full size)
So the last skin care mask type product I got in a Birchbox was the NERD skincare Mask and it BROKE ME OUT. It’s been three weeks and I still can’t get rid of the acne. I’m still annoyed. But these are just for the eyes and it’s not the same brand so I’ll try it. These are supposed to help de-puff and hydrate your under eye area. I hope they work, and get rid of dark circles too.
Brand: Eyeko
Product: Black Magic Mascara
Shade: N/A
Price: $24 (full size)
I’m really excited to try this mascara. It’s supposed to be volumizing, and that’s my favorite type. I also think the packaging is the cutest thing EVER. It’s got a natural fiber wand. I won’t know how I like this until I’ve tried it a few times. If you want to know how it turns out let me know and I’ll post an update.


Brand: Embryolisse
Product: Lait-Crème Concentre
Shade: N/A
Price: $16-28
This is a VERY high end product. The packaging is really nice. It comes in one of those soft metal tubes. I’m not sure why because these are harder to recycle then a normal plastic tube. The moisturizer smells great and seems really hydrating. I really want to love this product but I’m scared of how much money I will spend if I really like it.

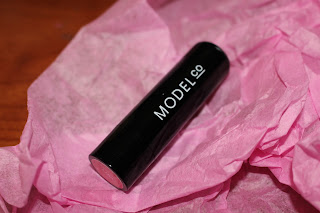
Brand: Model Co
Product: Ultra Long Lasting Lipstick
Shade: Kitty
Price: $20

Ok so I NEVER buy Lipstick that costs more than $20. Obviously, this is right on the edge but I was really excited because the color is gorgeous!  It goes on simi sheer but is easily buildable and ultra-moisturizing. The only problem I have with this product is that it is not what I would consider long lasting. The swatch completely disappeared from my hand within 2 hours of doing nothing but working on the computer. I’ll have to see how it lasts on my lips but as of now it is not at the top of my list.

Tuesday, October 6, 2015

Choosing A Foundation For Your Skin Type


Acne Prone Skin

Go for a full coverage foundation. Try to choose something liquid or cream based. I would try to find one that is oil free. A good choice is Clinique Acne Solution BB Crème or for those of us on a budget Neutrogena SkinClearing Oil Free Makeup. These both have ingredients that will help clear your acne and full coverage.


Dry Skin


For those of us who have dry skin choose a foundation that is a little lighter coverage and has some type of moisturizing ingredient. My favorite would be Makeup Forever Ultra HD Foundation. It is fairly light and supper moisturizing. It does have a more dewy finish but won’t cling to dry patches. For a drugstore option try Revlon’s Photoready Foundation.

Oily Skin  

So I don’t want to spend all my time talking about Clinique but if you’re looking to conceal your oily skin and want a matte finish you have got to try Clinique’s Stay Matte Oil Free Foundation. This will change your life. It is a full coverage but feels super light on your skin and you will not see an oily spot all day. For a drugstore buy that is almost as good try Maybelline’s Fit Me! Matte Foundation. This product also comes in a non-matte formula so be careful.

Normal Skin

YOU ARE THE LUCKEIST PERSON IN THE WORLD IF YOU’RE IN THIS CATEGORY. You can literally wear any foundation you want. Stay away from any that are specifically for acne prone skin but everything else is up to you. Any level of coverage will be great and you can play with all the different textures and finishes.


I encourage you to have fun no matter what skin type you fall into. Don’t feel like you have to have a matte finish just because your skin is oily. If you like a luminous finish go for it. Just be yourself and have a great time. If you have any questions feel free to leave a comment and if you want any other blogs about make up for skin types let me know!